If you’ve ever thought about producing your own honey or supporting the environment in a meaningful way, learning how to start a bee colony is one of the most rewarding paths you can take. Beekeeping is not just a hobby—it’s a blend of science, observation, patience, and environmental stewardship. Whether you’re exploring starting a bee colony at home, building a small backyard apiary, or simply curious about how to start beekeeping for beginners, this guide will give you a clear, expert-level foundation.
Honey bees play a critical role in pollination, supporting everything from backyard gardens to large-scale agriculture. Without them, many crops and flowering plants would struggle to reproduce. That means by keeping bees, you’re not just producing organic honey, you’re actively contributing to agricultural sustainability and the health of local ecosystems.
In this in-depth guide, you’ll learn how to establish a hive from scratch, understand bee behavior, manage colony health, and harvest your own honey—while avoiding common beginner mistakes. This isn’t surface-level advice; it’s practical, experience-driven insight designed to help you succeed from day one.
Understanding the Basics of Beekeeping
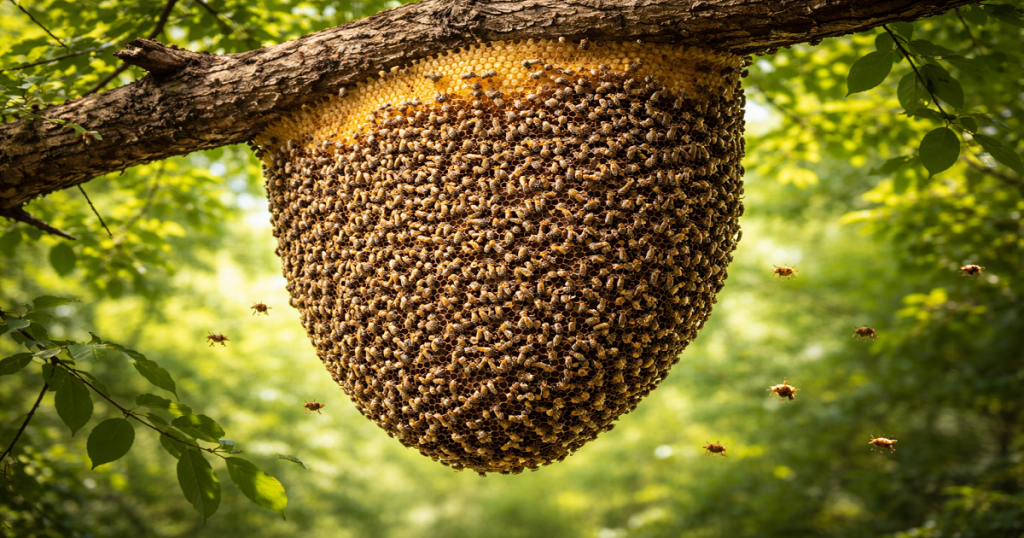
Before you even think about setting up a backyard bee colony, you need to understand how a colony functions as a living system. A hive isn’t just a box of insects—it’s a highly organized superorganism where every bee has a defined role.
The Structure of a Bee Colony
A typical colony consists of three types of bees, each essential for survival, such as.
Queen bee
The queen is the reproductive engine of the hive. She can lay up to 1,500–2,000 eggs per day during peak season. But her role goes beyond reproduction—she produces pheromones that regulate colony behavior, cohesion, and even mood. A weak or failing queen often leads to a collapsing colony.
Worker bees
These are all female bees and make up about 95% of the colony. Their responsibilities change with age. Younger workers focus on brood care and cleaning, while older workers transition into foragers. They are responsible for honey production, propolis collection, feeding larvae with royal jelly, and defending the hive.
Drone bees
Drones exist solely to mate with a virgin queen. They do not forage, produce honey, or defend the hive. During times of food scarcity, worker bees often expel drones to conserve resources. Understanding these roles helps you make better decisions in hive management and identify problems early.
Bee Lifecycle and Brood Development
The bee lifecycle is a tightly regulated process that directly impacts colony strength: Egg (laid by the queen), Larva (fed intensively by worker bees), Pupa (sealed in wax cells), Adult bee.
The entire cycle takes about 21 days for worker bees. Strong, consistent brood development is one of the clearest signs of a healthy colony. When inspecting a hive, experienced beekeepers look for a “solid brood pattern”—a dense, uniform area of developing bees. Spotty or irregular brood can indicate disease, poor nutrition, or queen issues.
Why Start a Bee Colony?
Many beginners underestimate how impactful beekeeping can be. It’s not just about honey—it’s about ecology, food systems, and sustainability.
Environmental and Practical Benefits
Pollination support
Honey bees significantly improve yields in crops and backyard gardens. Even a single hive can enhance the productivity of nearby flowering plants.
Organic honey production
Harvesting your own honey ensures purity and avoids additives commonly found in commercial products.
Strengthening local ecosystems
Bees support biodiversity by enabling plant reproduction, which in turn supports birds and other wildlife.
Educational and therapeutic value
Beekeeping teaches patience, observation, and responsibility. Many beekeepers describe it as deeply calming and rewarding.
Essential Beekeeping Equipment
Choosing the right beekeeping equipment isn’t about buying everything—it’s about buying the right things.
Core Equipment Explained
Langstroth hive
This is the industry standard and the best choice for beginners. Its modular design allows you to expand the hive as your colony grows. It also makes hive inspection easier and more efficient.
Brood box
This is where the queen lays eggs and where brood development occurs. It’s the heart of your colony. A healthy brood box is non-negotiable.
Honey super
This sits above the brood box and is where bees store excess honey. You harvest from here, leaving the brood box undisturbed.
Frames and foundation
Frames provide structure for bees to build comb. Foundation sheets guide them to build a straight, manageable comb instead of irregular structures.
Smoker tool
One of the most misunderstood tools. Smoke masks alarm pheromones and calms bees, making inspections safer and less stressful for the colony.
Practical Tip
Don’t cut corners on protective gear. Confidence during hive work comes from feeling safe. A calm beekeeper leads to calm bees.
How to Start a Bee Colony Step by Step
This is where theory meets practice. If you’re wondering how to start a bee colony step by step, here’s a realistic, field-tested approach.
Step 1: Understand Your Local Environment
Before buying anything, observe your surroundings. Are there enough pollinator-friendly plants nearby? What are the seasonal nectar flow patterns? Local conditions determine your success more than equipment.
Step 2: Choose the Right Bees
For beginners, a nucleus colony (nuc) is the best option. It already contains a laying queen, Worker bees, and Brood in various stages. This gives you a head start compared to package bees, which require more management early on.
Step 3: Set Up Your Hive Properly
Hive placement is critical. Face the entrance toward morning sunlight. Keep it slightly elevated to prevent moisture buildup. Ensure easy access for inspections. Avoid high-traffic human areas. Good placement reduces stress on both bees and the beekeeper.
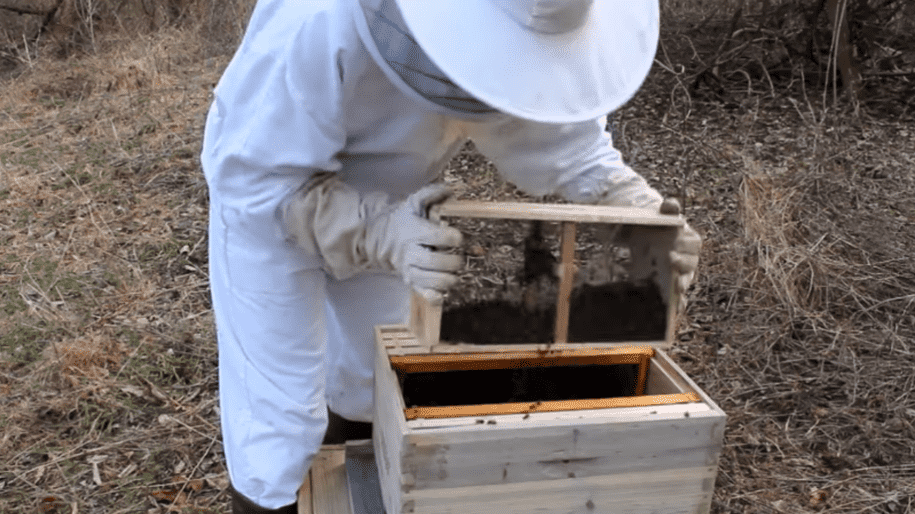
Step 4: Install the Bees
When transferring bees into your hive, move slowly and deliberately. Sudden movements can agitate the colony. Always check that the queen is safely introduced—her acceptance determines whether your colony thrives or fails.
Step 5: Feed and Monitor Early Growth
New colonies often need sugar syrup until natural nectar sources become available. During this stage, frequent but gentle hive inspection helps you confirm: The queen is lying. Brood is developing properly. Bees are building a comb.
Hive Management and Colony Health
Successful beekeeping is really about consistency. Strong colony health comes from small, regular actions.
Key Management Areas
Monitoring nectar flow
When flowers bloom heavily, bees collect nectar rapidly. This is when you add honey supers to prevent overcrowding.
Swarm control
A crowded hive may split naturally, causing you to lose half your bees. Prevent this by giving them enough space and monitoring queen cells.
Pest control in beekeeping
The biggest threat is varroa mites, which weaken bees and spread viruses. Regular monitoring and treatment are essential.
Seasonal Beekeeping Tasks
Beekeeping isn’t a “set it and forget it” activity. A bee colony is constantly responding to environmental changes—temperature, nectar availability, daylight, and forage diversity. As a beekeeper, your role shifts with the seasons. Understanding why you do something is just as important as what you do.
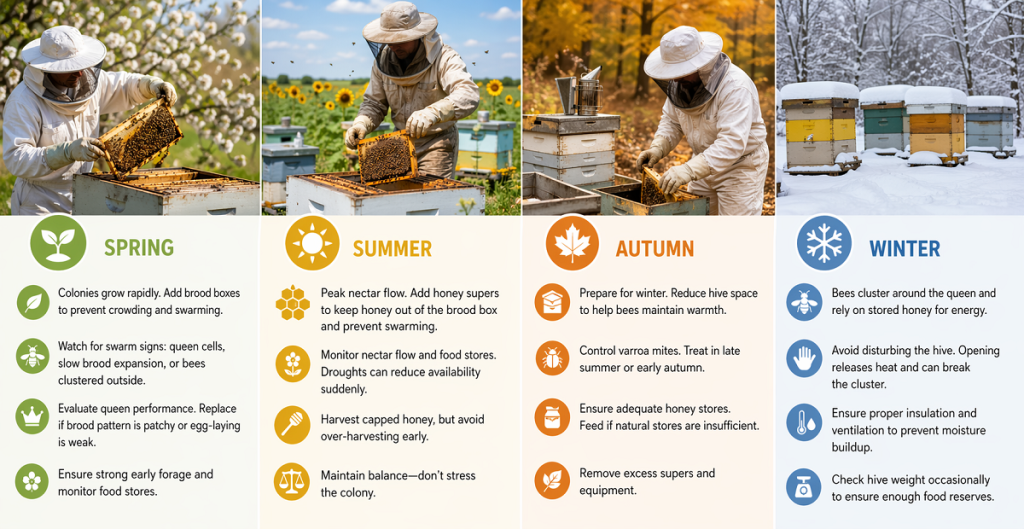
Spring
Spring is when the colony comes back to life after winter. As temperatures rise and early flowering plants begin producing nectar, the queen dramatically increases egg-laying. The population can double in just a few weeks.
Adding a brood box during this period isn’t just about giving space—it’s about preventing congestion in the brood nest. If the hive becomes crowded too quickly, the colony’s instinct is to reproduce through swarming, which means you could lose a large portion of your bees.
This is also the time when experienced beekeepers pay close attention to swarm indicators. The presence of queen cells along the bottom of frames, a sudden slowdown in brood expansion, or bees clustering outside the hive can all signal that the colony is preparing to split.
Equally important is evaluating the queen bee’s performance. A strong queen will produce a tight, consistent brood pattern. If you notice patchy brood or reduced egg-laying early in the season, replacing the queen sooner rather than later can save the entire colony.
Summer
Summer is the most active and productive time in the hive. Worker bees are foraging continuously, taking advantage of peak nectar flow. This is when your colony shifts from survival mode into surplus production.
Adding honey supers during this period is critical. If you delay, bees may start storing nectar in the brood box, restricting the queen’s laying space. This can weaken colony growth and increase swarming pressure.
Monitoring food storage isn’t just about honey yield—it’s about balance. Even in summer, a sudden drought or lack of blooms can disrupt nectar flow. A good beekeeper watches not just what’s inside the hive, but also what’s happening in the surrounding environment.
Early harvesting can be done if frames are fully capped, but experienced beekeepers avoid being overly aggressive. Removing too much honey too early can stress the colony, especially if nectar availability drops unexpectedly.
Autumn
Autumn is when many beginners make mistakes. The colony is no longer focused on growth—it’s preparing for survival. What you do in this season determines whether your bees make it through winter. Reducing hive space is important because a smaller, compact colony retains heat more efficiently. Empty boxes or unused frames create unnecessary space that the bees cannot defend or regulate.
This is also the most critical time for pest control in beekeeping, especially for varroa mites. Mite populations often peak in late summer and early autumn, and if left untreated, they can weaken winter bees—the very bees responsible for keeping the colony alive through cold months. Ensuring adequate honey stores is non-negotiable. A colony typically needs a significant reserve of honey to survive winter. If natural stores are insufficient, supplemental feeding becomes necessary.
Winter
Winter is not a dormant period—it’s a survival phase. Bees cluster tightly around the queen, generating heat by vibrating their muscles. They rely entirely on stored honey for energy. The biggest mistake beginners make is disturbing the hive too often during winter. Opening the hive releases heat and can break the cluster, which may lead to colony death in cold conditions.
Your role during this time is mostly external—ensuring proper insulation, preventing moisture buildup, and occasionally checking hive weight to confirm they still have enough food reserves. Moisture, more than cold, is often the real threat. Condensation inside the hive can drip onto the cluster and kill bees. Proper ventilation is crucial.
How to Harvest Honey from Your Own Bee Colony
Harvesting honey is often seen as the reward for your hard work—but experienced beekeepers treat it as a careful, balanced process rather than a simple extraction.
Signs Honey Is Truly Ready for Harvest
One of the most reliable indicators is capped honeycomb. When bees seal cells with wax, it means the moisture content is low enough for long-term storage. Uncapped honey may still contain too much water and can ferment after extraction. Heavy frames are another sign, but weight alone can be misleading.
A frame can feel heavy due to nectar that hasn’t fully ripened into honey. That’s why visual inspection matters. Stabilized nectar flow is also important. If flowers are still abundant, bees are actively producing. Harvesting too early during an ongoing flow can disrupt their storage patterns.
Honey Harvesting
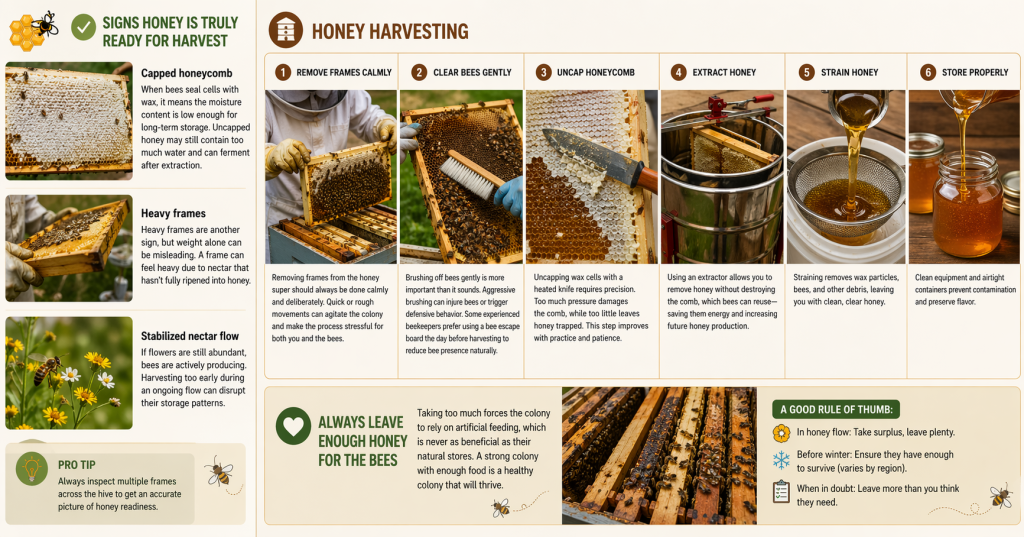
Removing frames from the honey super should always be done calmly and deliberately. Quick or rough movements can agitate the colony and make the process stressful for both you and the bees. Brushing off bees gently is more important than it sounds. Aggressive brushing can injure bees or trigger defensive behavior. Some experienced beekeepers prefer using a bee escape board the day before harvesting to reduce bee presence naturally.
Uncapping wax cells with a heated knife requires precision. Too much pressure damages the comb, while too little leaves honey trapped. This step improves with practice and patience. Using an extractor allows you to remove honey without destroying the comb, which bees can reuse—saving them energy and increasing future honey production.
Straining and storing honey properly ensures quality. Clean equipment and airtight containers prevent contamination and preserve flavor. Most importantly, always leave enough honey for the bees. Taking too much forces the colony to rely on artificial feeding, which is never as beneficial as their natural stores.
Practical Insights from Real Beekeeping Experience
This is where theory ends, and real beekeeping begins. Experience teaches you patterns that no guide fully explains.
What Beginners Often Get Wrong
Opening the hive too frequently is one of the most common mistakes. Every inspection disrupts temperature, pheromone balance, and workflow inside the colony. Bees need stability more than constant monitoring. Ignoring early signs of queen failure can quickly lead to colony collapse. A weak queen means fewer worker bees, which directly affects foraging, brood care, and overall hive strength.
The weather is often underestimated. Extended rain or extreme heat can reduce foraging opportunities, leading to sudden food shortages even in peak seasons. Delaying pest treatment—especially for varroa mites—is one of the fastest ways to lose a colony. By the time visible symptoms appear, the infestation is often already severe.
Professional Tips That Make a Real Difference
Keeping detailed notes after every hive inspection may seem tedious, but it builds a long-term understanding of your colony’s patterns. Over time, you’ll recognize seasonal trends, queen performance, and recurring challenges.
Learning to “read” the hive goes beyond visual checks. The sound of the bees, their flight patterns, and even the smell of the hive can tell you what’s happening inside. Experienced beekeepers often detect problems before they become visible.
Starting small is not just practical—it’s strategic. Managing one or two hives allows you to focus on learning rather than reacting. Once you understand hive management, scaling becomes much easier and more sustainable.
Cost of Starting a Bee Colony
A realistic breakdown helps you plan properly.
| Item | Estimated Cost |
| Hive setup | $150–$300 |
| Bees (nuc) | $120–$200 |
| Protective gear | $60–$150 |
| Tools | $50–$100 |
Total: $400–$750
While this may seem high initially, long-term returns in honey and pollination often justify the investment.
Frequently Asked Questions (FAQs)
What is the easiest way to start beekeeping?
Starting with a nucleus colony and a Langstroth hive is the simplest approach for beginners.
How long before I can harvest honey?
Typically, within 4–6 months, depending on nectar availability.
Do I need a lot of space?
No, even a small backyard can support a hive if properly managed.
Are bees dangerous?
Bees are generally non-aggressive when undisturbed and properly managed.
How often should I check my hive?
Every 7–10 days during active seasons.
What do bees eat in winter?
They survive on stored honey.
Can I start without experience?
Yes, but learning from local beekeepers or mentors helps significantly.
What is the biggest threat to bees?
Varroa mites and pesticide exposure.
How much honey can one hive produce?
20–60 pounds annually under good conditions.
Is beekeeping profitable?
It can be, especially when scaled or combined with other farm products.
Conclusion
Mastering how to start a bee colony is a journey that blends science, patience, and respect for nature. From understanding the bee lifecycle and setting up your first hive to managing colony health and harvesting honey, every step builds your confidence and skill. Whether you’re exploring how to start a small honey bee farm or simply want a thriving backyard hive, the key is consistent learning and thoughtful care. With the right approach, your bees will not only produce honey but also contribute to a healthier environment.